Сорок два
Administrator


Here's a guide to install an Allods Online version 7.0 server on a Linux server (WSL2 also works) with the mentioned prerequisites. Make sure to follow each step carefully to avoid any issues.
Guide to Installing an Allods Online Version 7.0 Server on Linux
This guide will provide you with the necessary steps to set up an Allods Online version 7.0 server on a Linux system. Ensure you have the following prerequisite software installed:
- Prerequisite Software:
- PHP 7.4
- MySQL 5 (Version 8 not supported)
- PostgreSQL 9.3
- PostgreSQL Extensions: unixODBC, odbc-postgresql, libpostgresql-jdbc-java
- software-properties-common
- ca-certificates
- unrar
- wget
Assuming our server will be located in the directory /srv/allods:
 Step 1: Download & extract Allods 7.0 server
 To download and extract the Allods 7.0 server, follow these steps:
- Download the "game" server folder (25GB) using wget:
Bash:wget https://community.allods-developers.eu/data/attachments/[ADC]Game_7_0.rar - Download the server files (1.4GB) using wget:
Bash:wget https://community.allods-developers.eu/data/attachments/[ADC][Linux]Server_7_0.rar - Extract the downloaded archives using unrar:
Bash:cd /srv/allods unrar x [ADC]Game_7_0.rar unrar x [ADC][Linux]Server_7_0.rar
Step 2: Installing PHP 7.4 - Update apt repositories and add PHP repository:
Bash:sudo apt update sudo apt -y install software-properties-common sudo add-apt-repository ppa:ondrej/php sudo apt-get update - Install PHP 7.4 and necessary extensions:
Bash:sudo apt install php7.4 php7.4-cli php7.4-mysql php7.4-odbc php7.4-pgsql
Step 3: Installing MySQL 5 & Creating database - Install MySQL 5 using the following command:
Bash:sudo apt install mysql-server-5.7 - Follow the prompts to configure MySQL 5. Remember to set a secure password for the root user.
- Create
allodsdatabase
Bash:mysql -u root -p mysql> CREATE DATABASE allods; - Import the MySQL dump file, follow these steps:
a. Navigate to the directory where your MySQL dump file is located. For example:
b. Run the following command to import the dump file into MySQL.Bash:cd /srv/allods
c. After entering the command, you will be prompted to enter your MySQL password. Once entered, the MySQL dump file will be imported into your MySQL server, populating allods database with tables.Bash:mysql -u root -p < allods.sql
Your databases should now be created and populated with data from the MySQL dump file, ready to be used by the Allods Online server.
Handling the "Package 'mysql-server-5.7' has no installation candidate" Error
If you encounter the "Package 'mysql-server-5.7' has no installation candidate" error, it may be due to an incompatibility of available versions with your system. Here's how to resolve this issue:
- Download the MySQL configuration file:
Bash:wget https://dev.mysql.com/get/mysql-apt-config_0.8.12-1_all.deb - Install the downloaded configuration file:
Bash:sudo dpkg -i mysql-apt-config_0.8.12-1_all.deb - During installation, a configuration interface will appear. Select MySQL 5.7 from the menu.
- Update apt repositories:
Bash:sudo apt update - Check available versions of MySQL Server:
You should get output similar to this:Bash:sudo apt policy mysql-server
Less:Installed: None Candidate: 8.0.17-0ubuntu2 Version table: 8.0.17-0ubuntu2 500 500 http://nl.archive.ubuntu.com/ubuntu eoan/main amd64 Packages 500 http://nl.archive.ubuntu.com/ubuntu eoan/main i386 Packages 5.7.28-1ubuntu18.04 500 500 http://repo.mysql.com/apt/ubuntu bionic/mysql-5.7 amd64 Packages 100 /var/lib/dpkg/status - Identify the available 5.7 version in the MySQL repository.
- Install the specific version of MySQL Server:
Replace <version-tag> with the specific version you identified. In our case, it would be:Bash:sudo apt install mysql-server=<version-tag> mysql-client=<version-tag>
Bash:sudo apt install mysql-server=5.7.34-1ubuntu16.04 mysql-client=5.7.34-1ubuntu16.04
Step 4: Installing PostgreSQL 9.3 - Add the PostgreSQL repository:
Bash:sudo apt-get install wget ca-certificates wget --quiet -O - https://www.postgresql.org/media/keys/ACCC4CF8.asc | sudo apt-key add - sudo sh -c 'echo "deb http://apt.postgresql.org/pub/repos/apt/ $(lsb_release -cs)-pgdg main" > /etc/apt/sources.list.d/pgdg.list' - Update apt repositories:
Bash:sudo apt update - Install PostgreSQL 9.3:
Bash:sudo apt install postgresql-9.3 postgresql-client-9.3 - Create postgres user
Bash:sudo adduser postgres - Enable and start postgresql
Bash:sudo systemctl enable postgres && systemctl start postgresql - (Optionnal)Create a dedicated user (for example
allods, in this guide I'll use this command to createallodsuser with password1450)
Bash:su - postgres createuser --interactive --pwprompt --superuser
Note: Ensure not to install a version of PostgreSQL higher than 9.3 to avoid a potential error related to incompatibility. Or you'll have an error similar to this one : you'll have an error : An SQLException was provoked by the following failure: java.lang.NumberFormatException: For input string: "22 (Ubuntu 10"
Step 5: Configuring PostgreSQL Extensions & allow remote connection In this step, we will configure PostgreSQL to allow remote connections. Follow these instructions:
- Install the required extensions:
Bash:sudo apt install unixodbc odbc-postgresql libpostgresql-jdbc-java - Modify the postgresql.conffile:
Bash:sudo vi /etc/postgresql/9.3/main/postgresql.conf #Find the line: #listen_addresses = 'localhost' #Uncomment the line and change it to: listen_addresses = '*' - Save and close the file.
- Modify the pg_hba.conf file:
Bash:sudo vi /etc/postgresql/9.3/main/pg_hba.conf #Find the line: host all all 127.0.0.1/32 md5 #Replace with it: host all all 0.0.0.0/0 md5 - Save and close the file.
- Restart the PostgreSQL server to apply the changes:
Bash:sudo service postgresql restart
That's it ! You have now configured the necessary softwares to run an Allods Online version 7.0 server on your Linux server.
Step 6: Setting up PostgreSQL Databases Before proceeding with launching the different servers, we need to create PostgreSQL users and databases: accounts, billing, shard, ships. You can create them using the CREATE DATABASE command.
- Connect to your PostgreSQL server:
Bash:sudo -u postgres psql
- Create databases for Allods Online:
SQL:CREATE DATABASE accounts; CREATE DATABASE billing; CREATE DATABASE shard; CREATE DATABASE ships; \q
Step 7: Launching the Servers Now let's proceed with launching the various servers: accountServer, masterServer, masterServerAgent, billingServer, itemMallServer, and finally Shard.
Note: When configuring server settings, it's recommended to use the LAN IP address of your Ubuntu or WSL (Windows Subsystem for Linux) system for better local network communication. You can find the LAN IP address of your Ubuntu or WSL system using the following command:
ip addr show | grep inet | grep -v 127.0.0.1 | grep -oP '(?<=inet\s)\d+(\.\d+){3}'Select the first address that is displayed. In my case the IP is
172.30.113.41Ensure to place the LAN IP address in the <auth> XML tag for the account server and in the <frontEnd> XML tag for the shard server during configuration. This ensures proper communication between the servers on your local network.
For accountServer:
- Navigate to the accountServer directory:
Bash:cd /srv/allods/server_bin/accountServer - Modify shard.xml to edit your database connection information. By default, if you strictely followed this guide, the PostgreSQL username is allods, and the password is 1450. You don't need to change the rest of the configuration to continue with this guide.
- Launch the accountServer:
You should seeBash:./accountServer.sh start
You can continue with the remaining servers following similar steps, ensuring that you configure database connection information appropriately in their respective configuration files before launching.
Note: Make sure to keep the server processes running in the background or as daemons using tools like screen or creating service units if necessary.
That's it ! You have now launched the Allods Online servers on your Linux system. You can proceed with further configurations or testing as required.
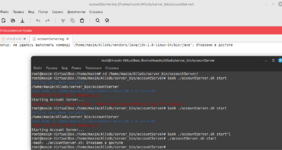
Step 8: Using the Servers Management Script After configuring and launching the different servers, you can simplify server management using a script that I wrote called servers.sh. This script, located at the root of the /server_bin directory, takes three parameters: start, status, and stop. It allows you to start, check the status, and stop all servers with a single command.
Here's how to use the script:
- Navigate to the /server_bin directory:
Bash:cd /srv/allods/server_bin - Run the script with the start parameter to start all servers:
Bash:./servers.sh start - You can check the status of all servers by running:
Bash:./servers.sh status - To stop all servers, use the stop parameter:
Bash:./servers.sh stop
Here's an example of how to use the server management script:
Step 9: Creating an Allods Account with PHP To create an Allods account programmatically using PHP, you can utilize the aorg.php script located at the root of the
/srv/allods directory. This script takes two arguments: a nickname and a password. Before using the script, ensure you have modified the database connection information within the script if needed.Follow these steps to create an Allods account:
- Navigate to the
/srv/allodsdirectory:
Bash:cd /srv/allods - Run the aorg.php script with the appropriate arguments. Replace <nickname> and <password> with the desired values for the account:
For example:Bash:php aorg.php <nickname> <password>
Bash:php aorg.php sorokdva 1450 - If everything goes well, the script will return:
Code:Account successfully registered!
Step 10: Connecting to the Game To connect to the game, follow these steps:
- Download the Allods Online client (
You do not have permission to view link Log in or register now.).
- Modify the Profiles/accountServer.cfg file. Update the account_srv_host variable with the LAN IP address of your machine. In our case, the IP address is 172.30.113.41.
- Launch the Allods Online launcher located in the bin folder.
- Enter your account credentials to log in and start playing the game.
Conclusion
Congratulations ! You have successfully configured and launched an Allods Online version 7.0 server on your Linux system. By following the steps outlined in this guide, you have set up the necessary software prerequisites, configured PostgreSQL for remote connections, and launched the various servers required for running the game.
Throughout this process, you've learned how to install PHP 7.4, MySQL 5, and PostgreSQL 9.3 along with their respective extensions. Additionally, you've configured PostgreSQL to accept remote connections, ensuring flexibility in accessing your database server.
Furthermore, with the provided script servers.sh, you can easily manage the server processes by starting, checking status, and stopping them with a single command, simplifying server administration tasks.
Moreover, you've learned to import MySQL dump files for database setup and to create Allods accounts using PHP scripts. Additionally, it's important to note that when configuring server settings, using the LAN IP address of your Ubuntu or WSL system enhances local network communication efficiency.
As you continue your journey with Allods Online, remember to stay updated with any new releases or patches and keep your server environment secure by implementing best practices for server management and security.
I hope this guide has been helpful in your endeavor to create and maintain an Allods Online server. Should you encounter any issues or have further questions, don't hesitate to refer to the official documentation or seek assistance from the Allods Developers Community.
Happy gaming !