Chapter 1 : How to mass edit existing Item.
If you are not familiar with developement world, Download notepad++, and do only your edit on it. Altough I can council you to use VScode. With AI API VScode can have a serious future, like to help you to automate faster stuff creation.
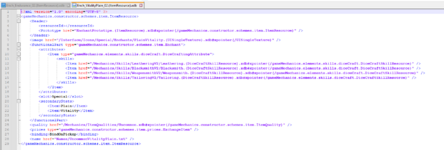
In this exemple, I wanted to mass mod draconic Item of GT located in : /data/Items/GurluhsorTowerTier2

To mass edit, select your wanted pattern, press CTRL + F , then go in replace section. Fill replace with case, and when its done, click on Replace All in All opened Documents.
Item decomposition of principal functionality that may explainations :
<functionalPart type "XXX"></functionalPart> -> A behaviour attach to item. in our case, main behaviour its to have Bonus Stats.
<level></level> -> Level of item, server will autogenerate stats of the level
<requiredLeved></requiredLevel> -> Level requirement to equip item
how stat will be generated ? Stats will be dynamically genreted thanks <level> and <quality>. In a future tutorial, i will show you where to change mechanics things.
Chapter 2 : Creating a basic Item by cloning
In my exemple I will simply clone an existant Item. I know its a basic operation, but its like that you will learn how are construct Items. At the moment you are not assisted by a software.
For my exemple, I will clone : Glyph.
I found this one, wich is a Glyph given endurance. Perfect, I decided to copy 5 I found.

After copying them, I simply created a new folder called "Custom" in /Items, so that i know what I've created very quickly and I separate vanilla to custom.
After doing it, i decided to add a new stat to my glyph : Vitality, i want a strong gylph of tier 2 !

<Slot></Slot> balise is to indicate in wich slot you equip glyph between, Offence, Special, Defence.
Now, be sure that <resourceId>XXXX</resourceId> is deleted, Its very important for next, because you are lazy
") and you dont want to loose 3 hours of writing Id's
and you dont want to loose 3 hours of writing Id'sChapter 3 : Creation of a new Costume !
To create a costume you must to have in mind :
- A costume must to be equipped
- A costume must to have visual texture
- A costume is stored in armory
First : Create a visual. You must to create a visual at first, its the base of a Costume. As always, I council you to copy an existant one and reuse slot to learn how it's build.
You will find all visuals in : /Items/VisualItems.
Then, symply attach visual to dressSlot balise, as in exemple :

Then, when its done, you must to create Item. As always, copy an existant costume, and replace <visualElement> balise, by referencing your new visual as in exemple :

As always, dont forget to delete ressource id balise !
Now we must to import our item in armory.
You will find it in /Client/GMUIhelper/
-> checkroom.xdb -> its a list in wich you will find costume categories.
-> folder "Lifestyle" its where you will find all costume list / subcategory
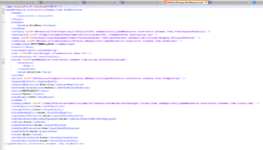
I decided to put my costumes in file "Collection.(Lifestylecollection).xdb" as it follow :

As you see I added a lot of lines, but im lazy so i used a powershell script to do it, i will share it with you; you just have to copy and past it in powershell terminal.
To open terminal in your current folder, do SHIFT + RIGHT CLICK and select "Open powershell terminal here"
Code:
Get-ChildItem -Recurse |
    Select-Object @{Name="Item";Expression={
        $path = $_.FullName -replace '\\', '/'
        $index = $path.IndexOf('/Items')
        if ($index -ne -1) {
            '<Item href="' + $path.Substring($index) + '#xpointer(/gameMechanics.constructor.schemes.item.ItemResource)" />'
        } else {
            $null
        }
    }} |
    Format-Table -HideTableHeaders
Once you ran it, it will return you directly adequat format to copy and paste in your file, very usefull when you have a lot of file to do.

Chapter 4 : Index and create a new Index.all
Its the funniest and less stable part ! take hours some time...
At the moment, you will use indexEditor software.
Open it and click on "File", then open and select /data/System

Once its done, after 3 world of tanks game's, software will by default show llike this :

If you have nothing, it can be normal, juste drag and drop 1 BY 1 folder's into blank box, and have same result as in screenshot. It takes time
Now if you remember well, we added glyph and costumes. But we must to add it in indexEditor. I do it with barbarian way, I delete "Items" follder in IndexEditor software, simply right click on it, and click on delete.
When it's done drag and drop item folder into IndexEditor and wait ... you have time to drink a coffee
Once it's done, click on Tools, Index Null Resources. if you are alpha lazy, click on "Index All Resources" and cross finger.

Once clicked on "Index Null Resources" (its why we let no ids
 ), it will ask you a number. You will find it by opening file : /data/System/index.all
Go at bottom, and take id and add 1 to last digit.
if it was 12214555 , yout put 12214556. Then click ok and wait...
Once you have Done! , click on File and click on "Save", it will save your new index.all and keep in memory in indexEditor new files you added.
Now launch build binaries, and go buy food.
Once you buyed your food, in folder data , you will find a bin folder into game/data. Just need to put it in bin.pak of your client and enjoy
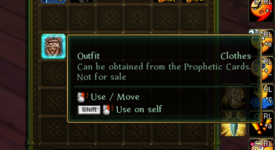
Here some in game content after repacking :
Costume :


Glyphe : As you can see, glyph is missing special stats ! I personaly know why
") I let you discover and search in files how glyph works, indice Enchants its word to designated them
I let you discover and search in files how glyph works, indice Enchants its word to designated them
And, GT draconic item.

I wish you good repacking, more tutorial will comes, this one is long because its first of series, and show basics to do your modification of contents. Repacking science, is a science wich must be practiced to understand.
I personally know huge of mechanic, like doing custome astral sectors, custom maps, import maps, doing spells etc ... it's a work of 10 years tuching allods files.
See you soon for next tutorial !
PS : dont hesitate to leave a comment if something is not understandable, i will be happy to upgrade this tutorial.
Attachments

Last edited: